

Original Post


How to rip DVD and convert video to popular media files
Now convert DVD movies and video movies are so easy for people. With a DVD Ripper and a video converter, you can do all the things. But now I will recommend you with Total Media Converter , which can help users to rip their DVD and convert their favorite videos to the popular media files with fast speed and high quality.
Media Converter Reviews article introduce you with Total Media Converter. With the best Media Converter, you can convert your DVD and videos to the popular SD video and HD video files. Also, you can extract the audio from video.
With powerful Media Converter, you can adjust the video effect (brightness, saturation, contract, hue and volume), set the play region, trimming any segment of your video, join several videos into a new one or cut one files into several segments, watermark your videos with text and pictures. So powerful functions, it will be your good helper for enjoy any media files.
Now I will show you how to rip DVD and convert video to the popular media files. You need download the trail version of Total Media Converter, and if you are a Mac user, you can use Total Media Converter for Mac .
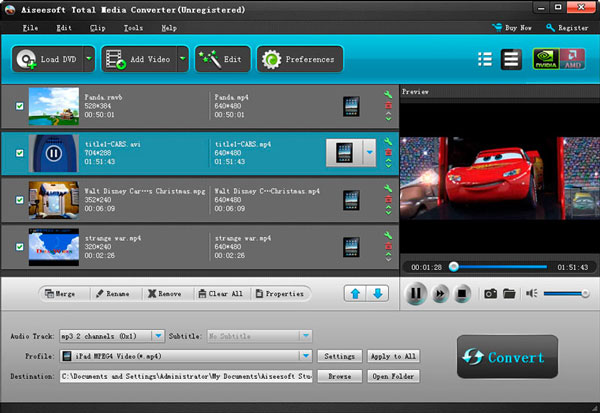
Install and run it on your PC and you will see the friendly interface:
Step 1: Load DVD/Video
Click Add File to load Videos from your computer
Click Load DVD to load your DVD from your DVD Drive.
Step 2: Choose Output Info
a. Convert video:
Choose output profile first in the drop-down list and then click settings button to adjust the specific settings, such as resolution, encoder, bit rate, frame rate and some audio settings such as audio encoder, sample rate and so on. You can save your profile and settings and give it a name, so you can use it next time easily.

b. Convert DVD
Choose output profile first and then you need to choose your output audio track and subtitle, if you do not want them you can leave them blank. Also like convert video you can adjust the specific output settings, such as resolution, bit rate and so on.
Save the profile and settings for next use is also available.
Step 3: Edit your video.
Adjust the output effect
You are allowed to adjust the Brightness, Contrast and Saturation of the output video. Deinterlacing is also available to improve the quality of the output video. You can choose apply to all to save your time.

You also can click Trim Crop Watermark button to perfect your video files.
Step 4: Start to convert.
Click Convert button to start convert your DVD and video files. And several minutes later, you will get your video files.
Media Converter Reviews article introduce you with Total Media Converter. With the best Media Converter, you can convert your DVD and videos to the popular SD video and HD video files. Also, you can extract the audio from video.
With powerful Media Converter, you can adjust the video effect (brightness, saturation, contract, hue and volume), set the play region, trimming any segment of your video, join several videos into a new one or cut one files into several segments, watermark your videos with text and pictures. So powerful functions, it will be your good helper for enjoy any media files.
Now I will show you how to rip DVD and convert video to the popular media files. You need download the trail version of Total Media Converter, and if you are a Mac user, you can use Total Media Converter for Mac .
Install and run it on your PC and you will see the friendly interface:
Step 1: Load DVD/Video
Click Add File to load Videos from your computer
Click Load DVD to load your DVD from your DVD Drive.
Step 2: Choose Output Info
a. Convert video:
Choose output profile first in the drop-down list and then click settings button to adjust the specific settings, such as resolution, encoder, bit rate, frame rate and some audio settings such as audio encoder, sample rate and so on. You can save your profile and settings and give it a name, so you can use it next time easily.
b. Convert DVD
Choose output profile first and then you need to choose your output audio track and subtitle, if you do not want them you can leave them blank. Also like convert video you can adjust the specific output settings, such as resolution, bit rate and so on.
Save the profile and settings for next use is also available.
Step 3: Edit your video.
Adjust the output effect
You are allowed to adjust the Brightness, Contrast and Saturation of the output video. Deinterlacing is also available to improve the quality of the output video. You can choose apply to all to save your time.
You also can click Trim Crop Watermark button to perfect your video files.
Step 4: Start to convert.
Click Convert button to start convert your DVD and video files. And several minutes later, you will get your video files.
«
Previous Thread
|
Next Thread
»