Original Post


How to make a smexy POV-Ray spinny head.
How to create a POV-Ray spinny head. (looks more awesome than GIMP)
NOT FOR NUBS TO COMPUTERS! this tutorial assumes you know basic functions such as installing a program, and creating shortcuts. etc
I created this tutorial on my own, I even made all the custom files so that it WILL work. (.inc wasnt made from scratch, that was an edit from clean.inc) This took effort, so please +rep me. :D
For ppl who dont know what is where in POV-Ray, i have labeled everything you need to know for this tut.
http://img401.imageshack.us/img401/3594/51328447eb1.jpg
Ex.
Step 1.
Download POV-Ray. http://www.povray.org/download/
Step 2.
Install it.
Step 3. (Only do this if on Windows Vista, if not on vista, skip to step 4.)
Make a shortcut to POV-Ray (if it wasn't automatically made)
right click on the shortcut> properties> compatibility tab> tick disable visual themes, and choose to run it in windows xp compatibility mode.
apply> ok
(always run it through this shortcut)
Step 4.
Download Virtual Dub. http://www.virtualdub.org/download.html
Step 5.
unzip that.
Step 6.
Download this zip, and unzip it to C:\Program Files\Toribash-3.0\raytrace
http://www.box.net/shared/r36k6yyp3a
Step 7.
Open the SpinnyHead.pov
Step 8.
On the first line, if it says #include "spinny head.inc" then leave it, if it doesnt, fix it so it does.
Step 9.
change the resolution to [160x120, AA 0.3] (its in a drop down box found on the far left of the screen at the top.)
Step 10.
Add this to the command line. initial_frame=11 final_frame=130 (that box you can type stuff in, to the right of the resolution drop-down box.)
Step 11.
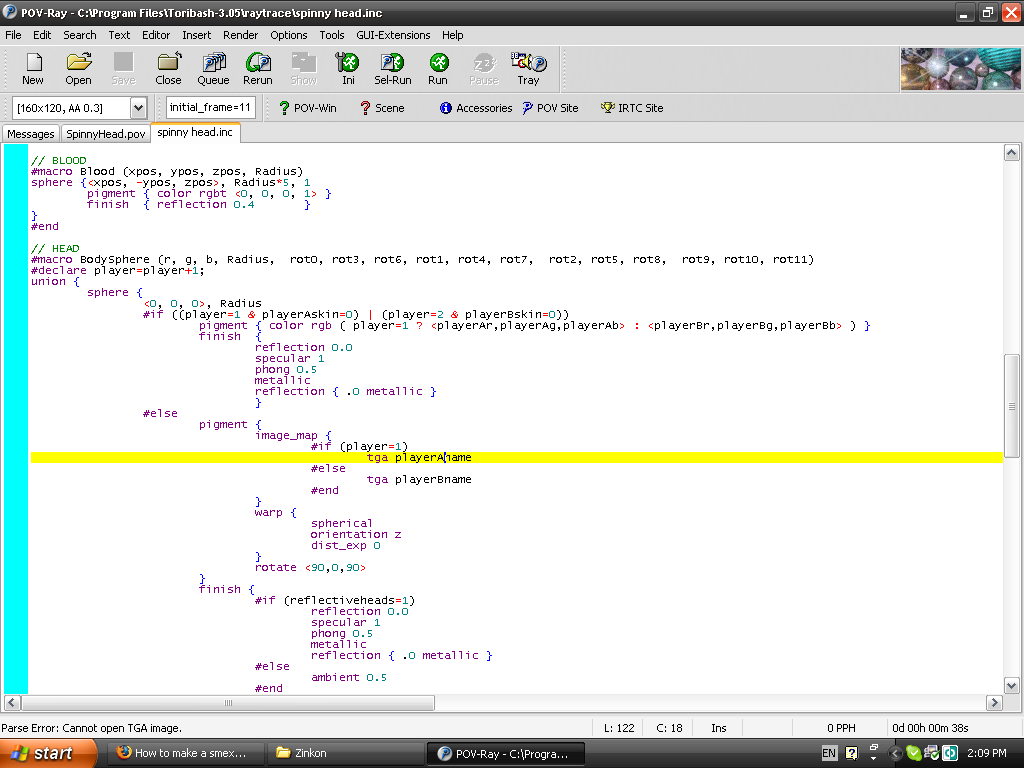
Open Spinny Head.inc
Step 12.
Find
// heads directory (must include trailing slash ie "dir\\" or "dir/").
#declare headdir="../custom/jam0864/";
(its near the top)
and change ../custom/jam0864/"; to ../custom/YOUR NAME/";
Step 13.
go to C:\Program Files\Toribash-3.0\custom\uke and copy head.tga into your custom folder, with the name uke.tga.
Step 14.
Switch back to SpinnyHead.pov and press Alt+G to render.
Step 15.
Wait until the render has finished. (it will make a sound and a little pop up thing)
Step 16.
Open VirtualDub.
Step 17.
Press File> Open> change 'All types' to 'Image Sequence'.
Step 18.
Go to your raytrace folder. (C:\Program Files\Toribash-3.0\raytrace)
Step 19.
open SpinnyHead011.bmp
Step 20.
Click Video> Filters> Add> Resize> Ok. Change 160 to 100. Click ok. Click ok again.
Step 21. (not necessary, just looks better for low resolution textures.)
Click Video> Filters> Add> blur. click ok. click ok again.
Step 22.
Click file> export> Animated Gif.
Save wherever you want.
go to the place you saved it and open the file.
There you go!
If I forgot something and it doesn't work please let me know. ;)
If you want more .inc's to render with, (different looking result) then ask me, and I will consider making a few more.
NOT FOR NUBS TO COMPUTERS! this tutorial assumes you know basic functions such as installing a program, and creating shortcuts. etc
I created this tutorial on my own, I even made all the custom files so that it WILL work. (.inc wasnt made from scratch, that was an edit from clean.inc) This took effort, so please +rep me. :D
For ppl who dont know what is where in POV-Ray, i have labeled everything you need to know for this tut.
http://img401.imageshack.us/img401/3594/51328447eb1.jpg
Ex.
Step 1.
Download POV-Ray. http://www.povray.org/download/
Step 2.
Install it.
Step 3. (Only do this if on Windows Vista, if not on vista, skip to step 4.)
Make a shortcut to POV-Ray (if it wasn't automatically made)
right click on the shortcut> properties> compatibility tab> tick disable visual themes, and choose to run it in windows xp compatibility mode.
apply> ok
(always run it through this shortcut)
Step 4.
Download Virtual Dub. http://www.virtualdub.org/download.html
Step 5.
unzip that.
Step 6.
Download this zip, and unzip it to C:\Program Files\Toribash-3.0\raytrace
http://www.box.net/shared/r36k6yyp3a
Step 7.
Open the SpinnyHead.pov
Step 8.
On the first line, if it says #include "spinny head.inc" then leave it, if it doesnt, fix it so it does.
Step 9.
change the resolution to [160x120, AA 0.3] (its in a drop down box found on the far left of the screen at the top.)
Step 10.
Add this to the command line. initial_frame=11 final_frame=130 (that box you can type stuff in, to the right of the resolution drop-down box.)
Step 11.
Open Spinny Head.inc
Step 12.
Find
// heads directory (must include trailing slash ie "dir\\" or "dir/").
#declare headdir="../custom/jam0864/";
(its near the top)
and change ../custom/jam0864/"; to ../custom/YOUR NAME/";
Step 13.
go to C:\Program Files\Toribash-3.0\custom\uke and copy head.tga into your custom folder, with the name uke.tga.
Step 14.
Switch back to SpinnyHead.pov and press Alt+G to render.
Step 15.
Wait until the render has finished. (it will make a sound and a little pop up thing)
Step 16.
Open VirtualDub.
Step 17.
Press File> Open> change 'All types' to 'Image Sequence'.
Step 18.
Go to your raytrace folder. (C:\Program Files\Toribash-3.0\raytrace)
Step 19.
open SpinnyHead011.bmp
Step 20.
Click Video> Filters> Add> Resize> Ok. Change 160 to 100. Click ok. Click ok again.
Step 21. (not necessary, just looks better for low resolution textures.)
Click Video> Filters> Add> blur. click ok. click ok again.
Step 22.
Click file> export> Animated Gif.
Save wherever you want.
go to the place you saved it and open the file.
There you go!
If I forgot something and it doesn't work please let me know. ;)
If you want more .inc's to render with, (different looking result) then ask me, and I will consider making a few more.
Last edited by Jam0864; Jan 14, 2009 at 02:31 PM.
nice.... i havent tried it yest but its very detailed so hat it makes it easier to do 
<Shlimby> lol, no Ad, just stop seeing those melons
<ADTerminal> Sure
<Shlimby> and dont take them into ur bed at night
<ADTerminal> But it's where I keep them warm
<ADTerminal> Sure
<Shlimby> and dont take them into ur bed at night
<ADTerminal> But it's where I keep them warm
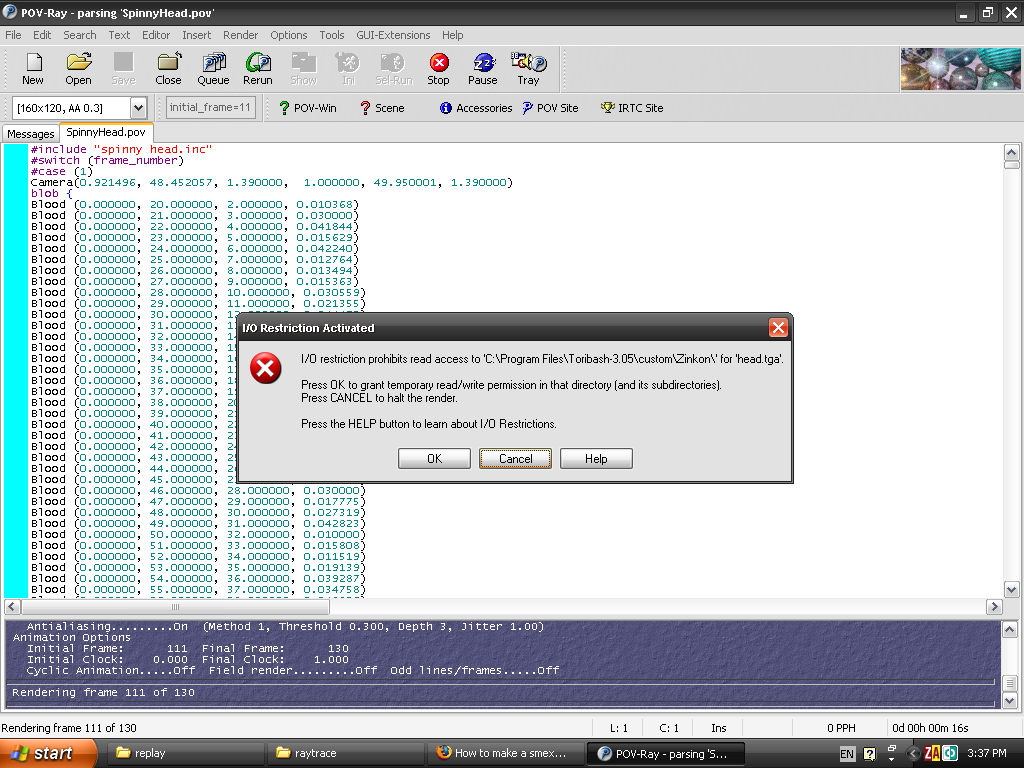
it looks like u didnt let the render finish, the render should be >100 frames long.
It should take at least 5 min to render.
u didnt rename any of the files? u put the command line in correctly? U let the whole thing render?
It should take at least 5 min to render.
u didnt rename any of the files? u put the command line in correctly? U let the whole thing render?
Last edited by Jam0864; Nov 21, 2007 at 12:08 PM.
 Program Files\Toribash-3.0\custom\uke and copy head.tga into your custom folder, with the name uke.tga.